简介
本文介绍starter的作用以及如何自定义SpringBootStarter。
starter的作用
简介
starter是SpringBoot中的一个新发明,它有效的降低了项目开发过程的复杂程度,对于简化开发操作有着非常好的效果。
Spring Boot Starter是在SpringBoot组件中被提出来的一种概念,stackoverflow上面已经有人概括了这个starter是什么东西:java – What are `spring-boot-starter` jars? – Stack Overflow
大概意思就是说starter是一种对依赖的synthesize(合成)。其内容如下:
Starter POMs are a set of convenient dependency descriptors that you can include in your application. You get a one-stop-shop for all the Spring and related technology that you need, without having to hunt through sample code and copy paste loads of dependency descriptors. For example, if you want to get started using Spring and JPA for database access, just include the spring-boot-starter-data-jpa dependency in your project, and you are good to go.
没有starter时的操作
在没有starter之前,假如我想要在Spring中使用jpa,那我可能需要做以下操作:
- 在Maven中引入使用的数据库的依赖(即JDBC的jar)
- 引入jpa的依赖
- 在xxx.xml中配置一些属性信息
- 反复的调试直到可以正常运行
需要注意的是,这里操作在我们每次新建一个需要用到jpa的项目的时候都需要重复的做一次。也许你在第一次自己建立项目的时候是在Google上自己搜索了一番,花了半天时间解决掉了各种奇怪的问题之后,jpa终于能正常运行了。有些有经验的人会在OneNote上面把这次建立项目的过程给记录下来,包括操作的步骤以及需要用到的配置文件的内容,在下一次再创建jpa项目的时候,就不需要再次去Google了,只需要照着笔记来,之后再把所有的配置文件copy&paste就可以了。
像上面这样的操作也不算不行,事实上我们在没有starter之前都是这么干的,但是这样做有几个问题:
- 如果过程比较繁琐,这样一步步操作会增加出错的可能性
- 不停地copy&paste不符合Don’t repeat yourself精神
- 在第一次配置的时候(尤其如果开发者比较小白),需要花费掉大量的时间
starter的逻辑
starter的主要目的就是为了解决上面的这些问题。
starter的理念:starter会把所有用到的依赖都给包含进来,避免了开发者自己去引入依赖所带来的麻烦。需要注意的是不同的starter是为了解决不同的依赖,所以它们内部的实现可能会有很大的差异,例如jpa的starter和Redis的starter可能实现就不一样,这是因为starter的本质在于synthesize,这是一层在逻辑层面的抽象,也许这种理念有点类似于Docker,因为它们都是在做一个“包装”的操作,如果你知道Docker是为了解决什么问题的,也许你可以用Docker和starter做一个类比。
starter的实现:虽然不同的starter实现起来各有差异,但是他们基本上都会使用到两个相同的内容:ConfigurationProperties和AutoConfiguration。因为Spring Boot坚信“约定大于配置”这一理念,所以我们使用ConfigurationProperties来保存我们的配置,并且这些配置都可以有一个默认值,即在我们没有主动覆写原始配置的情况下,默认值就会生效,这在很多情况下是非常有用的。除此之外,starter的ConfigurationProperties还使得所有的配置属性被聚集到一个文件中(一般在resources目录下的application.properties),这样我们就告别了Spring项目中XML地狱。
starter的整体逻辑:
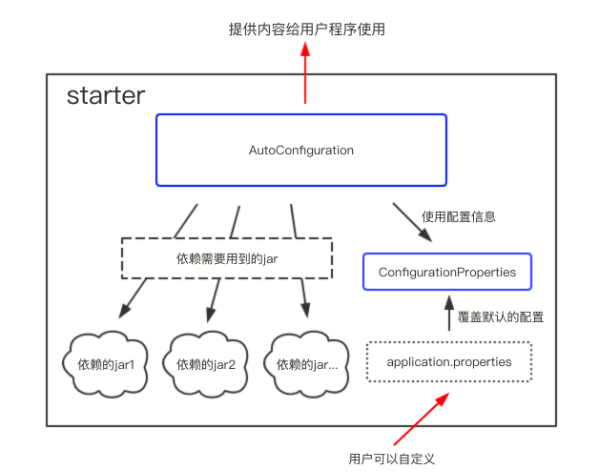
上面的starter依赖的jar和我们自己手动配置的时候依赖的jar并没有什么不同,所以我们可以认为starter其实是把这一些繁琐的配置操作交给了自己,而把简单交给了用户。除了帮助用户去除了繁琐的构建操作,在“约定大于配置”的理念下,ConfigurationProperties还帮助用户减少了无谓的配置操作。并且因为 application.properties 文件的存在,即使需要自定义配置,所有的配置也只需要在一个文件中进行,使用起来非常方便。
了解了starter其实就是帮助用户简化了配置的操作之后,要理解starter和被配置了starter的组件之间并不是竞争关系,而是辅助关系,即我们可以给一个组件创建一个starter来让最终用户在使用这个组件的时候更加的简单方便。基于这种理念,我们可以给任意一个现有的组件创建一个starter来让别人在使用这个组件的时候更加的简单方便,事实上Spring Boot团队已经帮助现有大部分的流行的组件创建好了它们的starter,你可以在这里查看这些starter的列表。
Starter流程概述
- Spring Boot在启动时扫描项目所依赖的JAR包,寻找包含spring.factories文件的JAR包
- 根据spring.factories配置加载AutoConfigure类
- 根据 @Conditional 注解的条件,进行自动配置并将Bean注入Spring Context
实战
生成starter
目标
需求:提供一个Service,包含一个能够将字符串加上前后缀的方法String wrap(String word)。
1. 依赖
<?xml version="1.0" encoding="UTF-8"?>
<project xmlns="http://maven.apache.org/POM/4.0.0" xmlns:xsi="http://www.w3.org/2001/XMLSchema-instance"
         xsi:schemaLocation="http://maven.apache.org/POM/4.0.0 https://maven.apache.org/xsd/maven-4.0.0.xsd">
    <modelVersion>4.0.0</modelVersion>
    <parent>
        <groupId>org.springframework.boot</groupId>
        <artifactId>spring-boot-starter-parent</artifactId>
        <version>2.3.0.RELEASE</version>
        <relativePath/> <!-- lookup parent from repository -->
    </parent>
    <groupId>com.example</groupId>
    <artifactId>example-spring-boot-starter</artifactId>
    <version>0.0.1-SNAPSHOT</version>
    <name>starter</name>
    <description>Demo project for Spring Boot</description>

    <properties>
        <java.version>1.8</java.version>
    </properties>

    <dependencies>
        <dependency>
            <groupId>org.springframework.boot</groupId>
            <artifactId>spring-boot-autoconfigure</artifactId>
            <scope>provided</scope>
        </dependency>
        <dependency>
            <groupId>org.springframework.boot</groupId>
            <artifactId>spring-boot-configuration-processor</artifactId>
            <scope>provided</scope>
        </dependency>
        <dependency>
            <groupId>org.springframework.boot</groupId>
            <artifactId>spring-boot-starter-web</artifactId>
        </dependency>
    </dependencies>
</project>
- artifactId的命名:Spring 官方 Starter通常命名为spring-boot-starter-{name}如 spring-boot-starter-web, Spring官方建议非官方Starter命名应遵循{name}-spring-boot-starter的格式。
- spring-boot-autoconfigure:必须引入的包
- spring-boot-configuration-processor:非必须的包。本包作用:
- 支持@ConfigurationProperties
- 编译时生成spring-configuration-metadata.json,此文件主要给IDE使用,用于提示使用。如在intellij idea中,当配置此jar相关配置属性在application.yml, 你可以用ctlr+鼠标左键,IDE会跳转到你配置此属性的类中
- spring-boot-starter-web:非必须的包。本处仅用来测试starter引入包之后,依赖此starter的工程无需引入。按理starter中不应该再次引入starter
2. 服务类
package com.example.starter;

public class ExampleService {
    private String prefix;
    private String suffix;

    public ExampleService(String prefix, String suffix) {
        this.prefix = prefix;
        this.suffix = suffix;
    }
    public String wrap(String word) {
        return prefix + word + suffix;
    }
}
3. 属性类
前缀、后缀通过读取application.properties(yml)内的参数获得
package com.example.starter;

import org.springframework.boot.context.properties.ConfigurationProperties;

@ConfigurationProperties("example.service")
public class ExampleServiceProperties {
    private String prefix;
    private String suffix;

    public String getPrefix() {
        return prefix;
    }

    public void setPrefix(String prefix) {
        this.prefix = prefix;
    }

    public String getSuffix() {
        return suffix;
    }

    public void setSuffix(String suffix) {
        this.suffix = suffix;
    }
}
4. 配置类
package com.example.starter;

import org.springframework.beans.factory.annotation.Autowired;
import org.springframework.boot.autoconfigure.condition.ConditionalOnClass;
import org.springframework.boot.autoconfigure.condition.ConditionalOnMissingBean;
import org.springframework.boot.autoconfigure.condition.ConditionalOnProperty;
import org.springframework.boot.context.properties.EnableConfigurationProperties;
import org.springframework.context.annotation.Bean;
import org.springframework.context.annotation.Configuration;

@Configuration
@ConditionalOnClass(ExampleService.class)
@EnableConfigurationProperties(ExampleServiceProperties.class)
public class ExampleAutoConfiguration {
    @Autowired
    private ExampleServiceProperties properties;

    @Bean
    @ConditionalOnMissingBean
    @ConditionalOnProperty(prefix = "example.service",value = "enabled",havingValue = "true")
    public ExampleService exampleService (){
        return new ExampleService(properties.getPrefix(),properties.getSuffix());
    }
}
- @ConditionalOnClass,当classpath下发现该类的情况下进行自动配置。
- @ConditionalOnMissingBean,当Spring Context中不存在该Bean时。
- @ConditionalOnProperty(prefix = “example.service”,value = “enabled”,havingValue = “true”),当配置文件中example.service.enabled=true时。
更多相关注解,建议阅读官方文档该部分。
5. 添加spring.factories
在resources/META-INF/下创建spring.factories文件,内容如下
org.springframework.boot.autoconfigure.EnableAutoConfiguration=com.example.starter.ExampleAutoConfiguration
如果有多个自动配置类,用逗号分隔换行即可。例如,spring-cloud-starter-alibaba-nacos-discovery-2021.1.jar=> MATE-INF=> spring.factories
org.springframework.boot.autoconfigure.EnableAutoConfiguration=\
  com.alibaba.cloud.nacos.discovery.NacosDiscoveryAutoConfiguration,\
  com.alibaba.cloud.nacos.endpoint.NacosDiscoveryEndpointAutoConfiguration,\
  com.alibaba.cloud.nacos.registry.NacosServiceRegistryAutoConfiguration,\
  com.alibaba.cloud.nacos.discovery.NacosDiscoveryClientConfiguration,\
  com.alibaba.cloud.nacos.discovery.reactive.NacosReactiveDiscoveryClientConfiguration,\
  com.alibaba.cloud.nacos.discovery.configclient.NacosConfigServerAutoConfiguration,\
  com.alibaba.cloud.nacos.NacosServiceAutoConfiguration
org.springframework.cloud.bootstrap.BootstrapConfiguration=\
  com.alibaba.cloud.nacos.discovery.configclient.NacosDiscoveryClientConfigServiceBootstrapConfiguration
6. 打包安装
法1:Idea图形化界面的命令
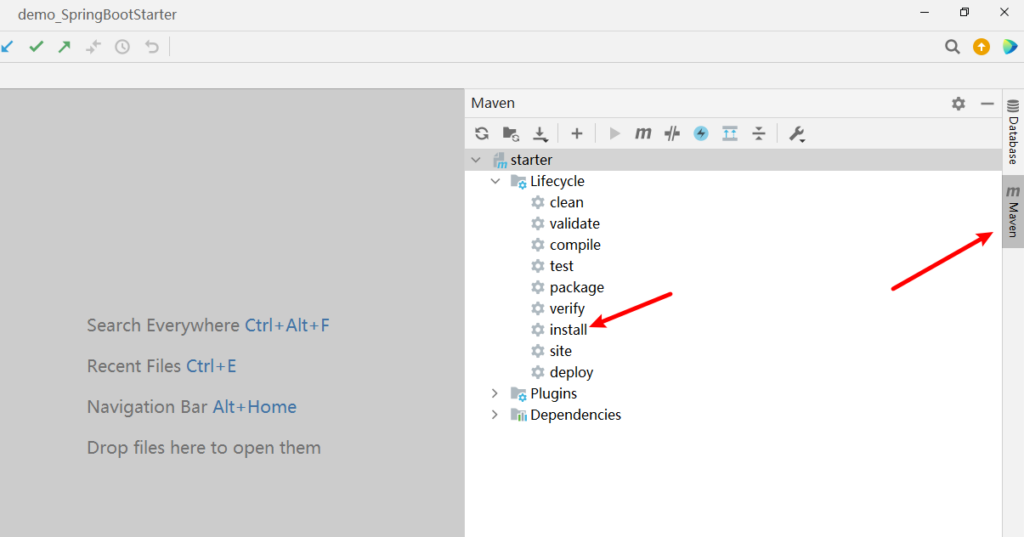
法2:用mvn命令
mvn:install
使用starter
依赖
只引入这一个即可
<dependency>
    <groupId>com.example</groupId>
    <artifactId>example-spring-boot-starter</artifactId>
    <version>0.0.1-SNAPSHOT</version>
</dependency>
application.yml
example:
  service:
    enabled: true
    prefix: '####'
    suffix: '@@@@'
controller
package com.example.controller;

import com.example.starter.ExampleService;
import org.springframework.beans.factory.annotation.Autowired;
import org.springframework.web.bind.annotation.RequestMapping;
import org.springframework.web.bind.annotation.RestController;

@RestController
@RequestMapping("/hello")
public class HelloController {
    @Autowired
    private ExampleService exampleService;

    @RequestMapping("/test1")
    public String test1() {
        return exampleService.wrap("hello");
    }
}
测试
postman访问:http://localhost:8080/hello/test1
结果:
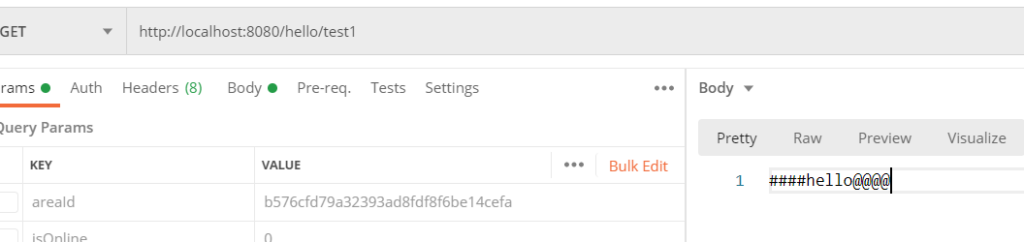

请先 !