简介
说明
本文用实例介绍Swagger的使用。
Swagger是很常用的接口文档工具,在类和方法上加个注解,就可以在网页端查看接口信息了。
Swagger界面不是很精致,有新的框架已经出现(knife4j),它是基于Swagger,对前端页面进行了美化,其他都没变:配置方法没变,还是使用Swagger的原来的注解。Knife4j的使用方法见:Knife4j–使用/教程/实例 – 自学精灵
相关网址
swagger的作用
- 接口文档在线自动生成。
- 功能测试。
为什么要用swagger?
为了减少与其他团队平时开发期间的频繁沟通成本,传统做法我们会创建一份RESTful API文档来记录所有接口细节,然而这样的做法有以下几个问题:
- 由于接口众多,并且细节复杂(需要考虑不同的HTTP请求类型、HTTP头部信息、HTTP请求内容等),高质量地创建这份文档本身就是件非常吃力的事,下游的抱怨声不绝于耳。
- 随着时间推移,不断修改接口实现的时候都必须同步修改接口文档,而文档与代码又处于两个不同的媒介,除非有严格的管理机制,不然很容易导致不一致现象。
官网
REST API Documentation Tool | Swagger UI
github
https://github.com/SpringForAll/spring-boot-starter-swagger(github:有详细教程)
swagger-springmvc: GitHub – springfox/springfox: Automated JSON API documentation for API’s built with Spring
swagger-ui: https://github.com/swagger-api/swagger-ui
swagger-core: https://github.com/swagger-api/swagger-core
swagger-spec:GitHub – OAI/OpenAPI-Specification: The OpenAPI Specification Repository
依赖及配置
法1:官方方案
引入官方依赖
        <dependency>
            <groupId>io.springfox</groupId>
            <artifactId>springfox-swagger2</artifactId>
            <version>2.9.2</version>
        </dependency>
        <dependency>
            <groupId>io.springfox</groupId>
            <artifactId>springfox-swagger-ui</artifactId>
            <version>2.9.2</version>
        </dependency>
第一个是API获取的包,第二是官方给出的一个ui界面。这个界面可以自定义,默认是官方的,对于安全问题,以及ui路由设置需要着重思考。
主类启用swagger
package com.example.demo;

import org.springframework.boot.SpringApplication;
import org.springframework.boot.autoconfigure.SpringBootApplication;
import springfox.documentation.swagger2.annotations.EnableSwagger2;

@SpringBootApplication
@EnableSwagger2
public class DemoSpringBootApplication {

    public static void main(String[] args) {
        SpringApplication.run(DemoSpringBootApplication.class, args);
    }

}
配置swagger
Swagger2Config.java
一定注意“RequestHandlerSelectors.basePackage”要填写正确
package com.example.demo.conf;

import org.springframework.context.annotation.Bean;
import org.springframework.context.annotation.Configuration;
import springfox.documentation.builders.ApiInfoBuilder;
import springfox.documentation.builders.ParameterBuilder;
import springfox.documentation.builders.PathSelectors;
import springfox.documentation.builders.RequestHandlerSelectors;
import springfox.documentation.schema.ModelRef;
import springfox.documentation.service.ApiInfo;
import springfox.documentation.service.Contact;
import springfox.documentation.service.Parameter;
import springfox.documentation.spi.DocumentationType;
import springfox.documentation.spring.web.plugins.Docket;
import springfox.documentation.swagger2.annotations.EnableSwagger2;

import java.util.ArrayList;
import java.util.List;

@Configuration
public class Swagger2Config {
    private boolean swaggerShow = true;
    @Bean
    public Docket createRestApi() {
        return new Docket(DocumentationType.SWAGGER_2)
                .enable(swaggerShow)
                .groupName("demo.controller1(groupName)")
                //.globalOperationParameters(getTocken())
                .apiInfo(apiInfo())
                .select()
                .apis(RequestHandlerSelectors.basePackage("com.example.demo.controller"))
                .paths(PathSelectors.any())
                .build();
    }

    // 可以为多个包添加接口说明。(@Bean的方法名是任意的)
    // 实际开发中,groupName与RequestHandlerSelectors.basePackage应一一对应。(本处为简洁用了同一个)
    @Bean
    public Docket createRestApi2() {
        return new Docket(DocumentationType.SWAGGER_2)
                .enable(swaggerShow)
                .groupName("demo.controller2(groupName)")
                //.globalOperationParameters(getTocken())
                .apiInfo(apiInfo())
                .select()
                .apis(RequestHandlerSelectors.basePackage("com.example.demo.controller"))
                .paths(PathSelectors.any())
                .build();
    }

    private ApiInfo apiInfo() {
        return new ApiInfoBuilder()
                .title("Swagger的Demo(title)")
                .description("Swagger的Demo(description)")
                //下边这行可以直接注释掉
                .termsOfServiceUrl("https://example.com")
                .contact(new Contact("xxx公司", "https://blog.csdn.net/feiying0canglang/", "abcd@qq.com"))
                .version("Swagger的Demo(version)")
                .build();
    }

//    public List getTocken() {
//        List<Parameter> list = new ArrayList<>();
//        ParameterBuilder tocken = new ParameterBuilder()
//                .name("token")
//                .description("认证信息")
//                .modelRef(new ModelRef("string"))
//                .parameterType("header")
//                //这里写token值
//                .defaultValue("xxxxxx")
//                .required(true);
//        list.add(tocken.build());
//
//        return list;
//    }
}
如上代码所示,
- 通过@Configuration注解,让Spring来加载该类配置。
- 再通过@EnableSwagger2注解来启用Swagger2。
- 再通过createRestApi函数创建Docket的Bean之后,apiInfo()用来创建该Api的基本信息(会展现在文档页面中)。
- select()函数返回一个ApiSelectorBuilder实例用来控制哪些接口暴露给Swagger来展现,本例采用指定扫描的包路径来定义,Swagger会扫描该包下所有Controller定义的API,并产生文档内容(除了被@ApiIgnore指定的请求)。
法2:starter方案
其他网址
https://github.com/SpringForAll/spring-boot-starter-swagger
引入依赖
	<dependency>
		<groupId>com.spring4all</groupId>
		<artifactId>swagger-spring-boot-starter</artifactId>
		<version>1.9.0.RELEASE</version>
	</dependency>
启用
在应用主类中增加@EnableSwagger2Doc注解
@EnableSwagger2Doc
@SpringBootApplication
public class DemoApplication {
    public static void main(String[] args) {
        SpringApplication.run(DemoApplication.class, args);
    }
}
默认情况下就能产生所有当前Spring MVC加载的请求映射文档。
配置示例
swagger.enabled=true

swagger.title=spring-boot-starter-swagger
swagger.description=Starter for swagger 2.x
swagger.version=1.4.0.RELEASE
swagger.license=Apache License, Version 2.0
swagger.licenseUrl=https://www.apache.org/licenses/LICENSE-2.0.html
swagger.termsOfServiceUrl=https://github.com/dyc87112/spring-boot-starter-swagger
swagger.contact.name=didi
swagger.contact.url=http://blog.didispace.com
swagger.contact.email=dyc87112@qq.com
swagger.base-package=com.didispace
swagger.base-path=/**
swagger.exclude-path=/error, /ops/**

swagger.globalOperationParameters[0].name=name one
swagger.globalOperationParameters[0].description=some description one
swagger.globalOperationParameters[0].modelRef=string
swagger.globalOperationParameters[0].parameterType=header
swagger.globalOperationParameters[0].required=true
swagger.globalOperationParameters[1].name=name two
swagger.globalOperationParameters[1].description=some description two
swagger.globalOperationParameters[1].modelRef=string
swagger.globalOperationParameters[1].parameterType=body
swagger.globalOperationParameters[1].required=false

// 取消使用默认预定义的响应消息,并使用自定义响应消息
swagger.apply-default-response-messages=false
swagger.global-response-message.get[0].code=401
swagger.global-response-message.get[0].message=401get
swagger.global-response-message.get[1].code=500
swagger.global-response-message.get[1].message=500get
swagger.global-response-message.get[1].modelRef=ERROR
swagger.global-response-message.post[0].code=500
swagger.global-response-message.post[0].message=500post
swagger.global-response-message.post[0].modelRef=ERROR
配置说明
默认配置:
- swagger.enabled=是否启用swagger,默认:true
- swagger.title=标题
- swagger.description=描述
- swagger.version=版本
- swagger.license=许可证
- swagger.licenseUrl=许可证URL
- swagger.termsOfServiceUrl=服务条款URL
- swagger.contact.name=维护人
- swagger.contact.url=维护人URL
- swagger.contact.email=维护人email
- swagger.base-package=swagger扫描的基础包,默认:全扫描
- swagger.base-path=需要处理的基础URL规则,默认:/**
- swagger.exclude-path=需要排除的URL规则,默认:空
- swagger.host=文档的host信息,默认:空
- swagger.globalOperationParameters[0].name=参数名
- swagger.globalOperationParameters[0].description=描述信息
- swagger.globalOperationParameters[0].modelRef=指定参数类型
- swagger.globalOperationParameters[0].parameterType=指定参数存放位置,可选header,query,path,body.form
- swagger.globalOperationParameters[0].required=指定参数是否必传,true,false
编写代码
Controller的方法不是很多,但很多方法都要用@ApiImplicitParam进行注解。如果方法增多,而大部分方法都是与User类有关的,那么有没有什么办法优化呢?
答案是:有。可把User类以及其字段进行注解,这样在Controller中就不用对大部分方法使用@ApiImplicitParam了。
法1:注解写到Controller
package com.example.demo.controller;

import com.example.demo.bean.User;
import io.swagger.annotations.Api;
import io.swagger.annotations.ApiImplicitParam;
import io.swagger.annotations.ApiImplicitParams;
import io.swagger.annotations.ApiOperation;
import org.springframework.web.bind.annotation.*;

import java.util.*;

//不写则默认为:"user-controller"。只写tags即可,页面上显示的是tags的值。
//@Api(tags = "用户控制器")
@Api(
       tags = {"用户控制器a(tags)", "用户控制器b(tags)"},
       value = "用户管理控制器(value)",
)
@RestController
@RequestMapping(value="/users")     // 通过这里配置使下面的映射都在/users下,可去除
public class UserController {
    static Map<Long, User> users = Collections.synchronizedMap(new HashMap<Long, User>());

    @ApiOperation("获取用户列表")
    @RequestMapping(value={""}, method=RequestMethod.GET)
    public List<User> getUserList() {
        List<User> r = new ArrayList<User>(users.values());
        return r;
    }

    @ApiOperation(value="创建用户", notes="根据User对象创建用户")
    @ApiImplicitParam(name = "user", value = "用户详细实体user",
          required = true, dataTypeClass = User.class)
    @RequestMapping(value="", method=RequestMethod.POST)
    public String postUser(@RequestBody User user) {
        users.put(user.getId(), user);
        return "success";
    }

    @ApiOperation(value="获取用户详细信息", notes="根据url的id来获取用户详细信息")
    @ApiImplicitParam(name = "id", value = "用户ID", required = true, dataTypeClass = Long.class)
    @RequestMapping(value="/{id}", method=RequestMethod.GET)
    public User getUser(@PathVariable Long id) {
        return users.get(id);
    }

    @ApiOperation(value="更新用户详细信息", notes="根据url的id指定更新对象,并根据传来的user信息更新用户详细信息")
    @ApiImplicitParams({
            @ApiImplicitParam(name = "id", value = "用户ID", required = true, dataTypeClass = Long.class),
            @ApiImplicitParam(name = "user", value = "用户详细实体user", required = true, dataTypeClass = User.class)
    })
    @RequestMapping(value="/{id}", method=RequestMethod.PUT)
    public String putUser(@PathVariable Long id, @RequestBody User user) {
        User u = users.get(id);
        u.setName(user.getName());
        u.setAge(user.getAge());
        users.put(id, u);
        return "success";
    }

    @ApiOperation(value="删除用户", notes="根据url的id来指定删除对象")
    @ApiImplicitParam(name = "id", value = "用户ID", required = true, dataTypeClass = Long.class)
    @RequestMapping(value="/{id}", method= RequestMethod.DELETE)
    public String deleteUser(@PathVariable Long id) {
        users.remove(id);
        return "success";
    }

    @ApiOperation(value="删除所有用户", notes="")
    @RequestMapping(value="", method= RequestMethod.DELETE)
    public String deleteAllUser() {
        users.clear();
        return "success";
    }
}
法2:注解写到Entity
Controller
UserController.java
package com.example.demo.controller;

import com.example.demo.bean.User;
import io.swagger.annotations.Api;
import io.swagger.annotations.ApiImplicitParam;
import io.swagger.annotations.ApiImplicitParams;
import io.swagger.annotations.ApiOperation;
import org.springframework.web.bind.annotation.*;

import java.util.*;

//不写,默认名字为:"user controller"。一般只写tags就够了。
@Api(   value = "用户管理控制器(value)",
        tags = {"用户控制器a(tags)", "用户控制器b(tags)"},
       //tags = "用户控制器"
)
//@Api(tags = "用户控制器")
@RestController
@RequestMapping(value="/users")     // 通过这里配置使下面的映射都在/users下,可去除
public class UserController {
    static Map<Long, User> users = Collections.synchronizedMap(new HashMap<Long, User>());

    @ApiOperation(value="获取用户列表", notes="")
    @RequestMapping(value={""}, method=RequestMethod.GET)
    public List<User> getUserList() {
        List<User> r = new ArrayList<User>(users.values());
        return r;
    }

    @ApiOperation(value="创建用户", notes="根据User对象创建用户")
    @RequestMapping(value="", method=RequestMethod.POST)
    public String postUser(@RequestBody User user) {
        users.put(user.getId(), user);
        return "success";
    }

    @ApiOperation(value="获取用户详细信息", notes="根据url的id来获取用户详细信息")
    @RequestMapping(value="/{id}", method=RequestMethod.GET)
    public User getUser(@PathVariable Long id) {
        return users.get(id);
    }

    @ApiOperation(value="更新用户详细信息", notes="根据url的id指定更新对象,并根据传来的user信息更新用户详细信息")
    @RequestMapping(value="/{id}", method=RequestMethod.PUT)
    public String putUser(@PathVariable Long id, @RequestBody User user) {
        User u = users.get(id);
        u.setName(user.getName());
        u.setAge(user.getAge());
        users.put(id, u);
        return "success";
    }

    @ApiOperation(value="删除用户", notes="根据url的id来指定删除对象")
    @RequestMapping(value="/{id}", method= RequestMethod.DELETE)
    public String deleteUser(@PathVariable Long id) {
        users.remove(id);
        return "success";
    }

    @ApiOperation(value="删除所有用户", notes="")
    @RequestMapping(value="", method= RequestMethod.DELETE)
    public String deleteAllUser() {
        users.clear();
        return "success";
    }
}
Entity
User.java
package com.example.demo.bean;

import io.swagger.annotations.ApiModel;
import io.swagger.annotations.ApiModelProperty;
import org.springframework.stereotype.Component;

@Data
@ApiModel(value = "用户详细实体user(value)", description = "用户id,名字,年龄(description)")
public class User {
    //一般这样即可:@ApiModelProperty("用户ID(value)")
    @ApiModelProperty(name = "id(name)", value = "用户ID(value)", required = true, dataType = "Long")
    private Long id;

    private String name;
    private Long age;
}
文档查看测试
运行项目。成功后访问:http://localhost:8080/swagger-ui.html
可得到此页面
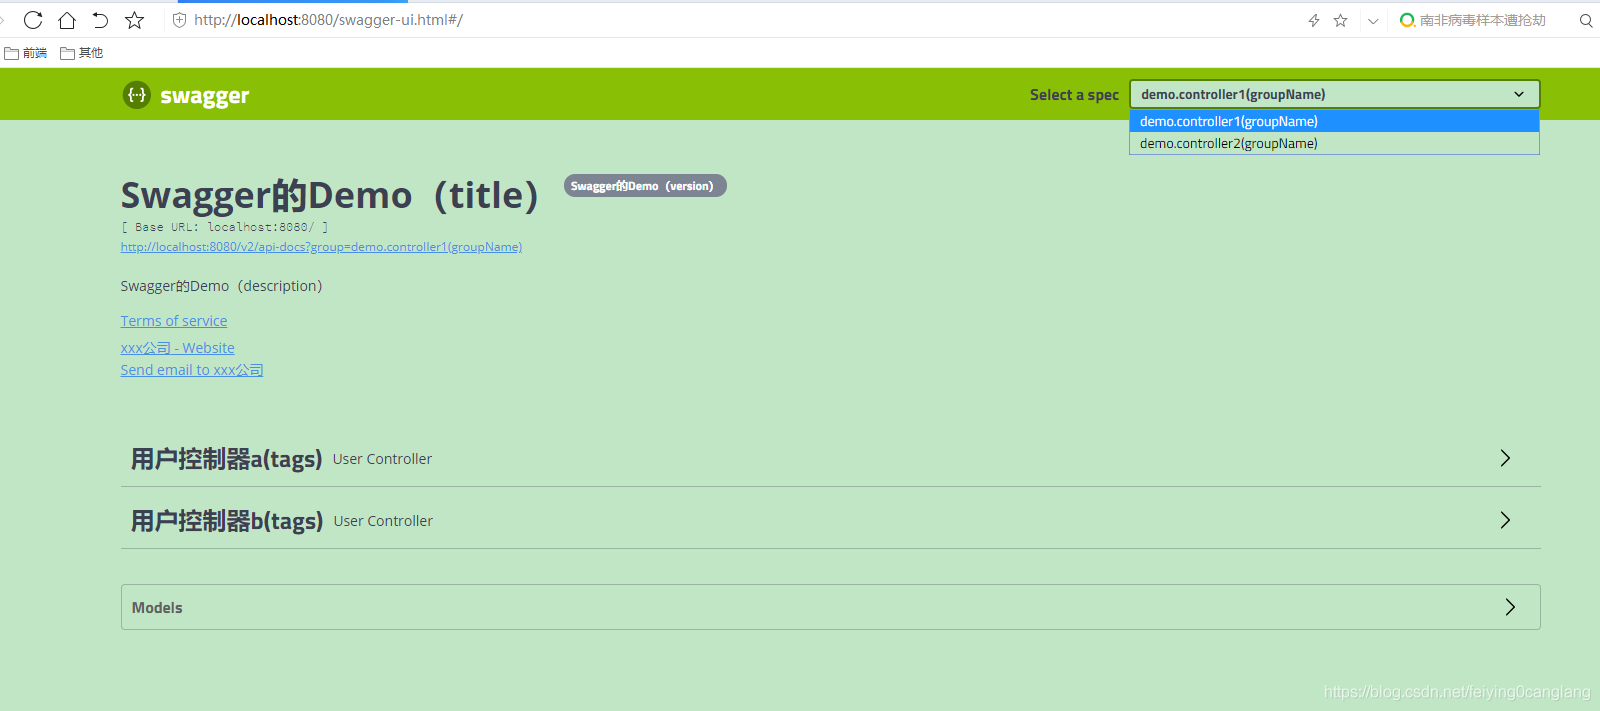
点击“Terms of service”:可以跳转到我们指定的网址,本处是“https://example.com”
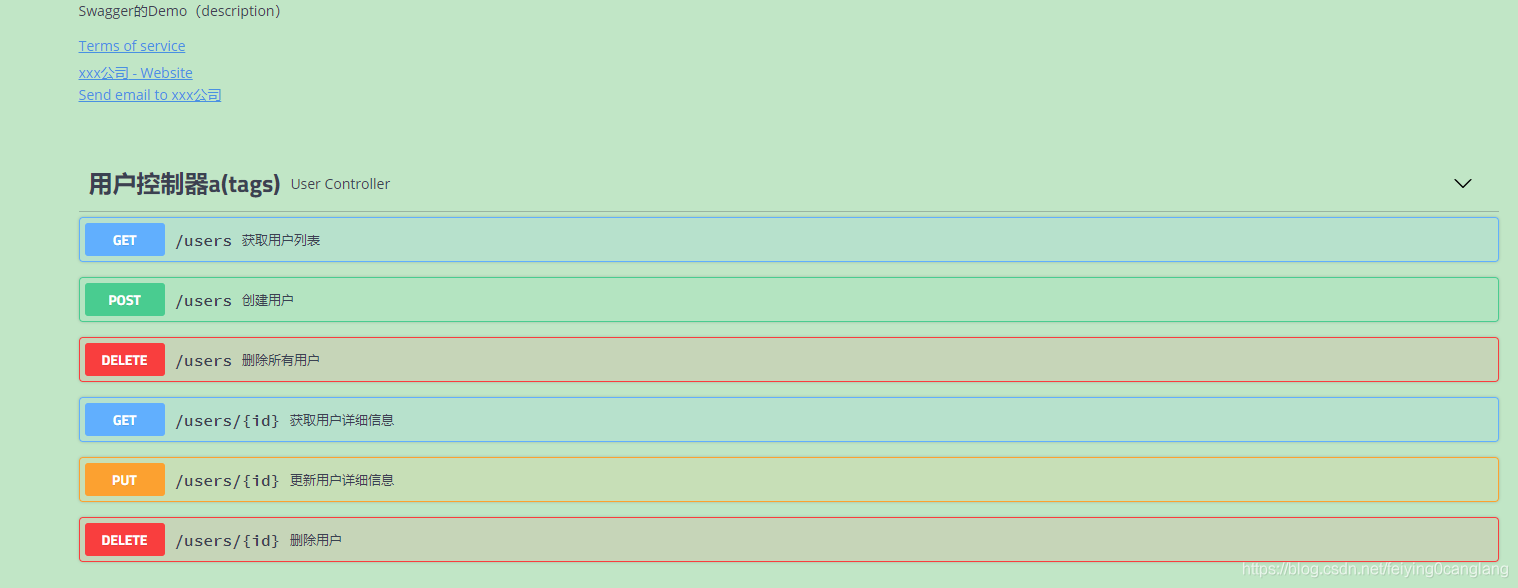
点击“用户控制器a(tags)”:可以查看接口
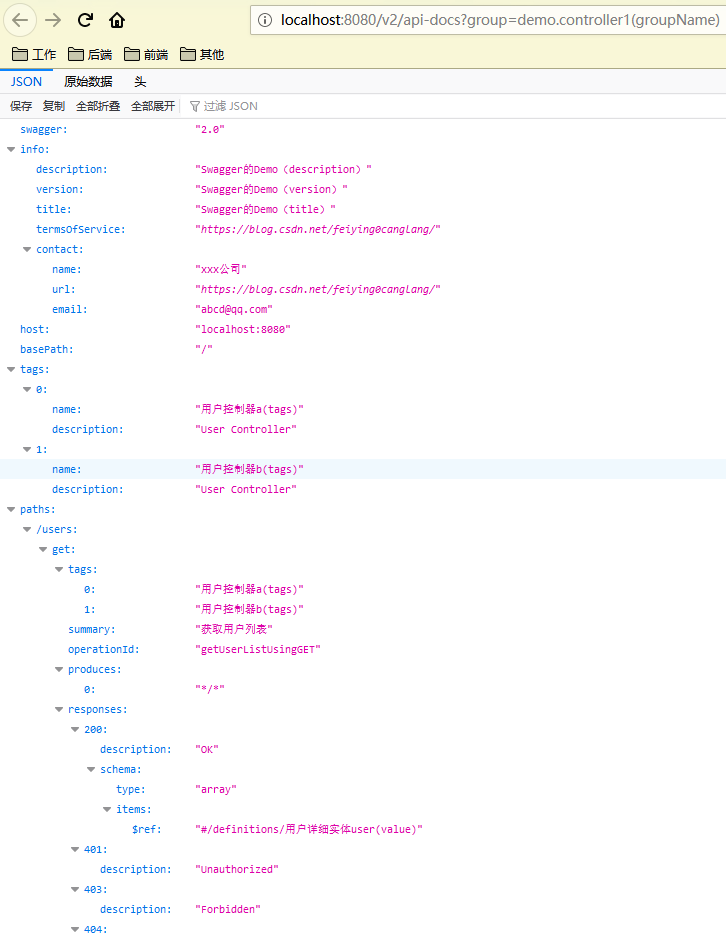
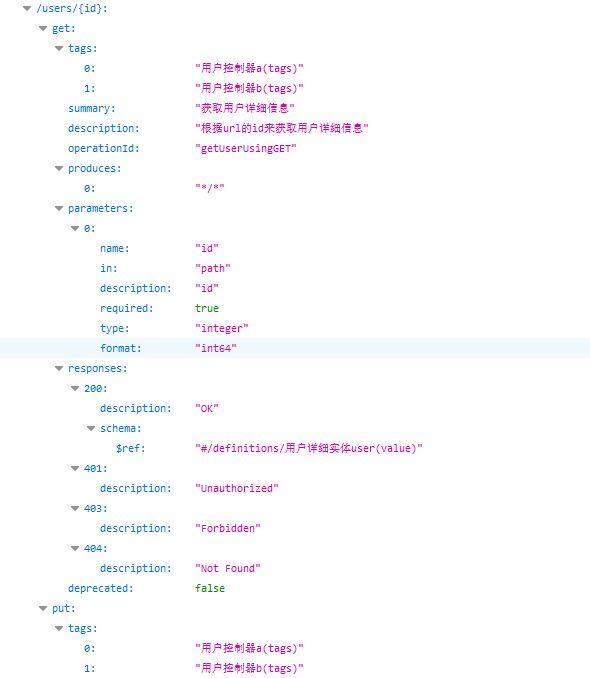
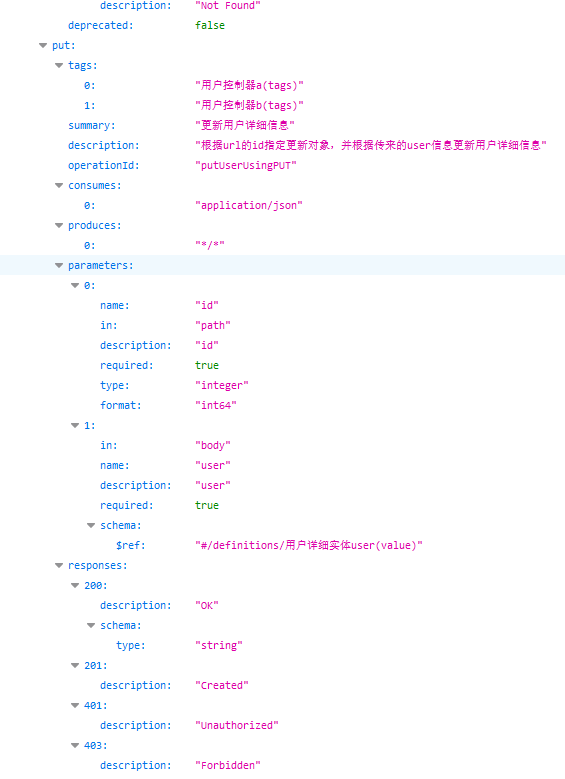
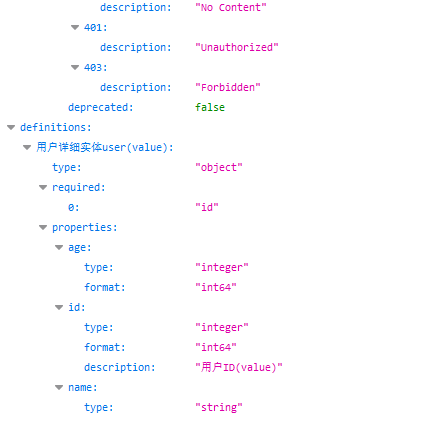
点击“http://localhost/v2/api-docs?group=demo.controller1(groupName)”:
可以得到下边内容
(我用的是火狐浏览器,它自动解析JSON,若是360极速浏览器则没这个效果)
接口实际测试
Swagger不仅可以提供接口查看,还可以直接测试。
接上文。点击“创建用户”
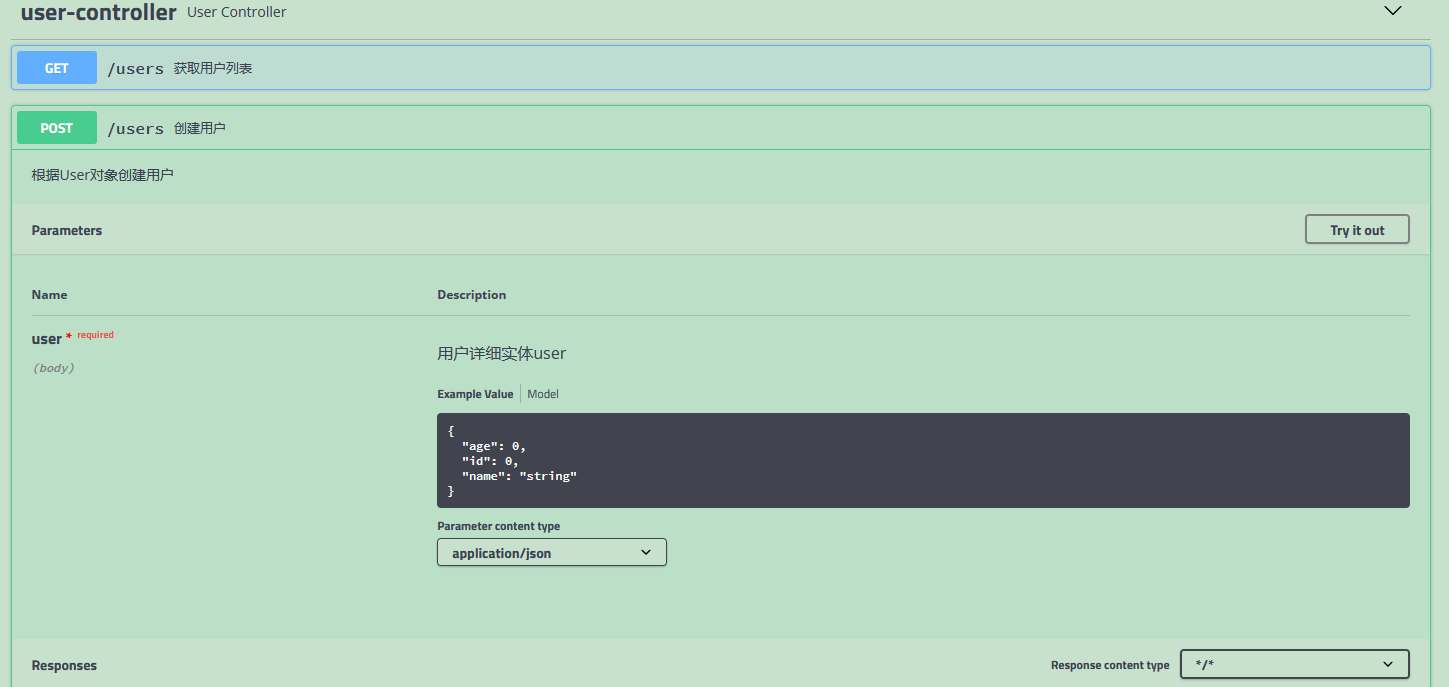
点击“Try it out”
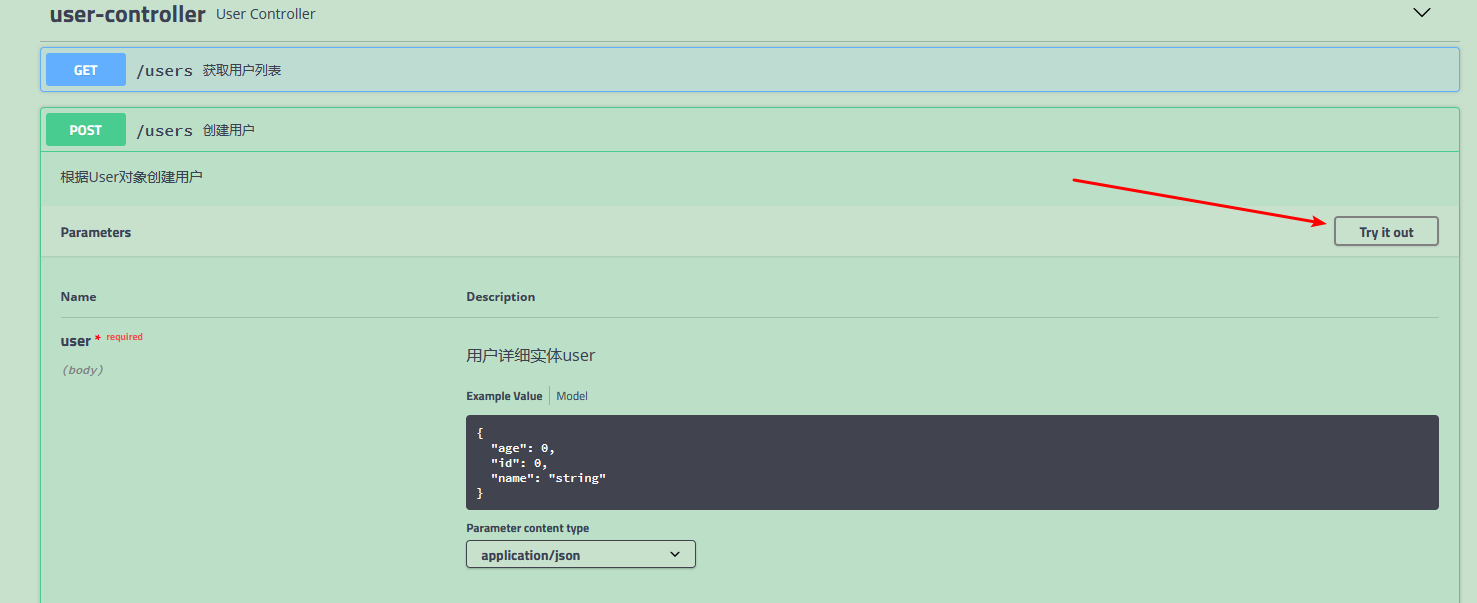
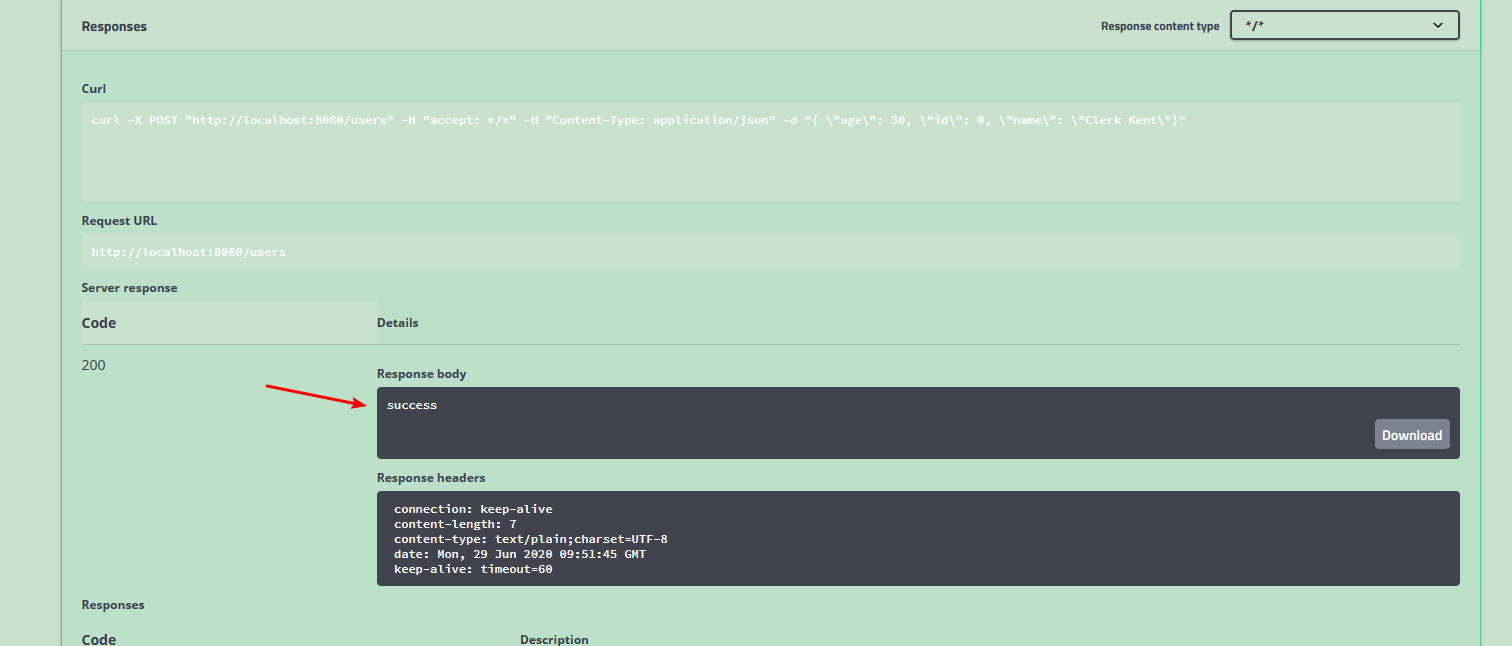
点击完之后出现以下界面。箭头所指的数字和字符串等是可以更改的,本处进行修改。改完后点击最下方“Execute”
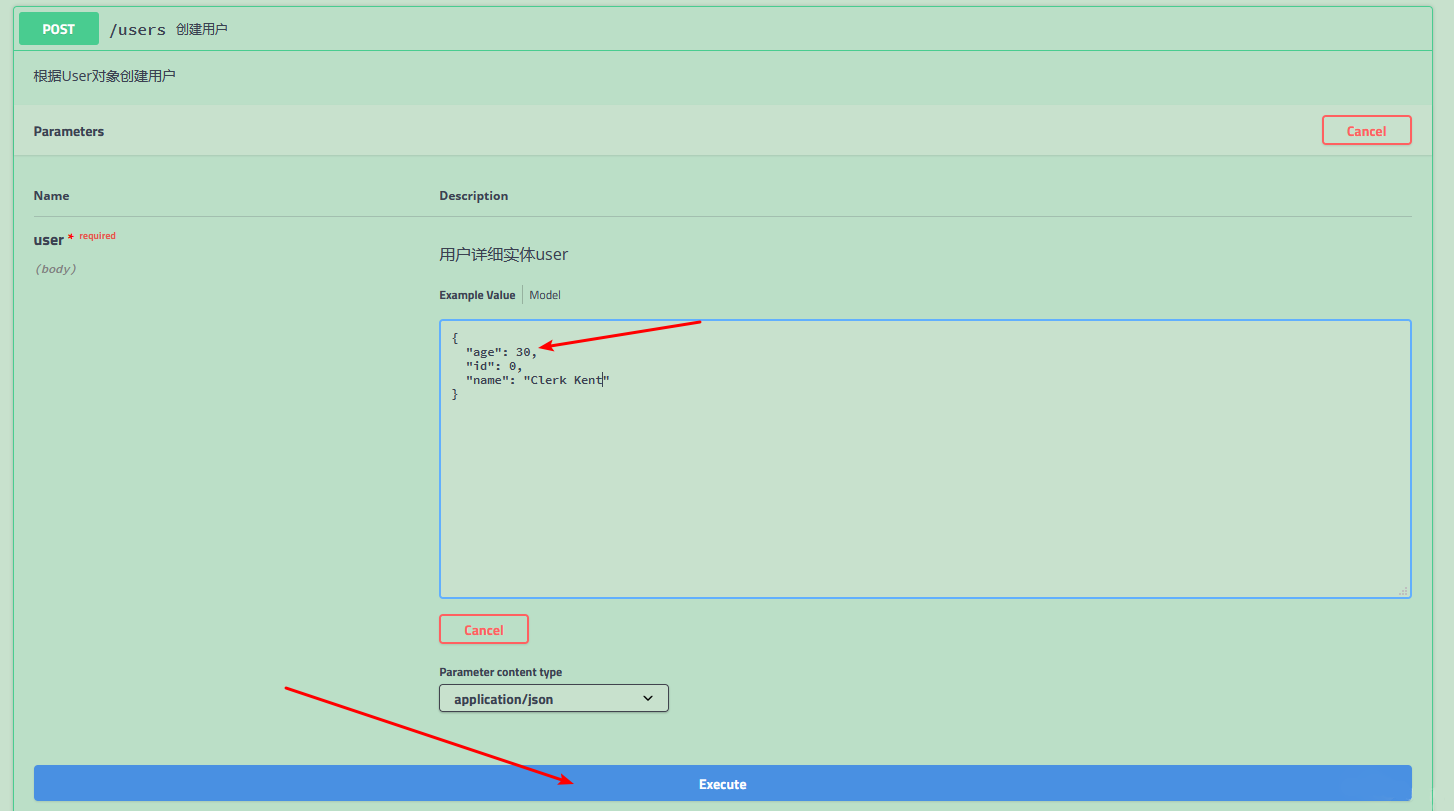
即出现成功响应
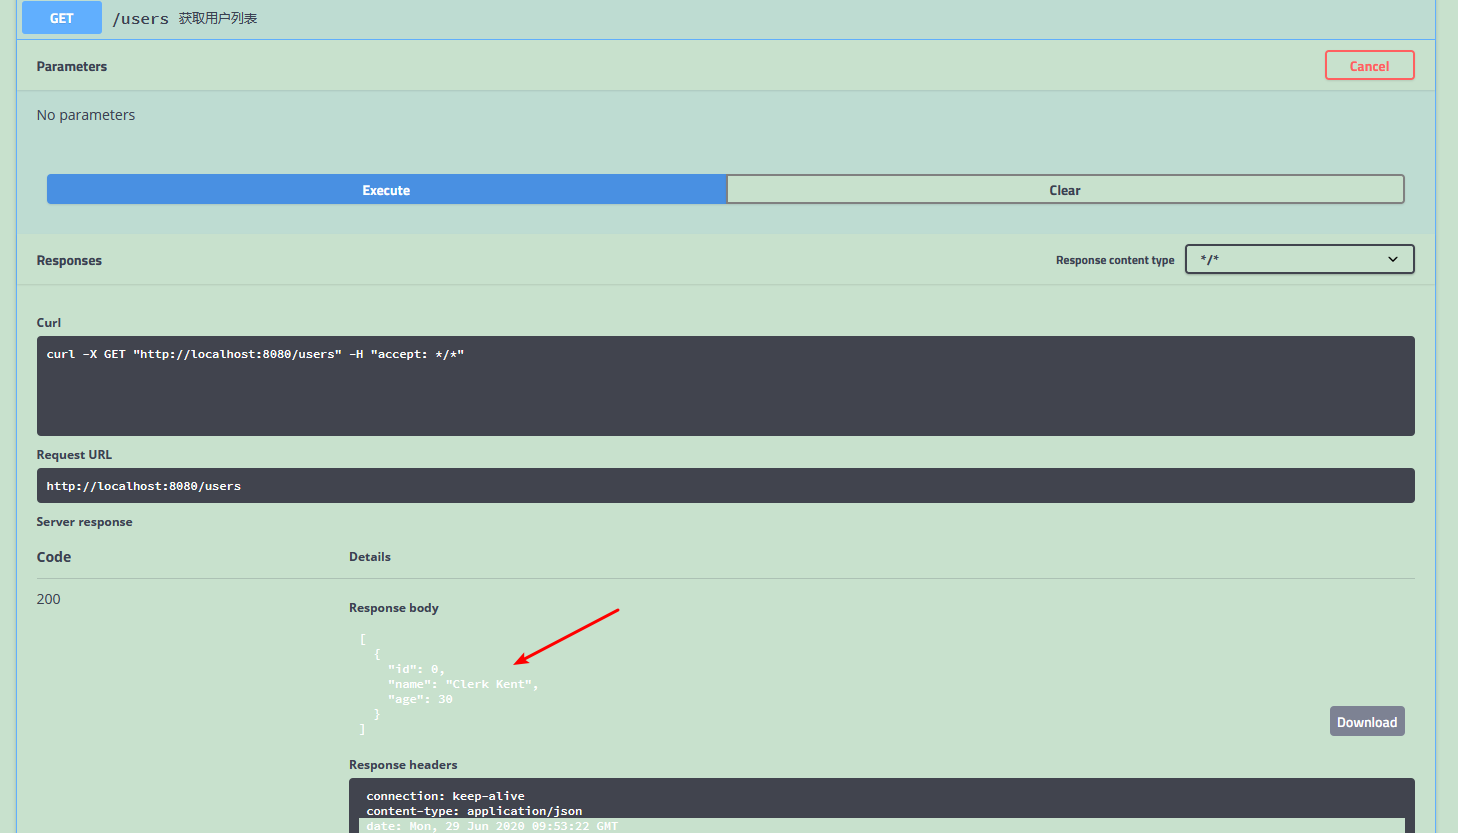
同样的操作,操作“获取用户列表” ,结果如下
问题解决
上传文件
错误写法
@PostMapping(value = "/upload-image")
@ApiOperation(value = "图片上传", notes = "图片上传")
@ApiImplicitParams({
		@ApiImplicitParam(name = "deviceId", value = "deviceId", required = true, dataType = "String"),
		@ApiImplicitParam(name = "attach", value = "上传文件", required = true, dataType = "File"),

})
public JsonResult imageUpload(String deviceId,
							  MultipartFile file) {
}
正确写法
@PostMapping(value = "/upload-image", headers="content-type=multipart/form-data")
@ApiOperation(value = "图片上传", notes = "图片上传")
@ApiImplicitParams({
		@ApiImplicitParam(name = "deviceId", value = "deviceId", required = true, dataType = "String")
})
public JsonResult imageUpload(String deviceId,
							  @ApiParam(name = "attach", value = "上传文件", required = true)
							  MultipartFile file) {
}
当然,如果与前端已经约定了用form-data,则无需添加: headers=”content-type=multipart/form-data”

请先 !